
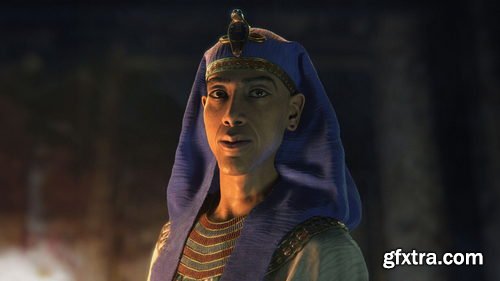
- Recreate a historical 3D portrait of King Akhenaten using Maya, ZBrush, Substance Painter, XGen, Marvelous Designer and Arnold. Mahmoud Salah, character and creature artist, takes artists on a journey of discovery, starting with a scan of an ancient statue together with a modern-day human head scan that he projects onto the ancient statue to help reimagine the historical figure.
- With the sculpt and facial details defined in ZBrush, Mahmoud uses Substance Painter to carefully align and enhance the skin texture. He instructs how to use Arnold for the look development process and how to leverage the esteemed Skin Shader, and dives deep into the eye setup and rendering workflow for realistic CG eyes.
- The hair grooming is handled using XGen in Maya to help push the realism of the artwork to the next level with hyper-realistic brows, lashes, and stubble. To adorn the character, in the final stage of the workshop, Mahmoud creates key accessories for the King, demonstrating his workflow for modeling and texturing a headdress and ornamental collar to display the character in its full glory.
- The goal of this workshop is to teach the skills artists need to reconstruct and reimagine any historical character in 3D.
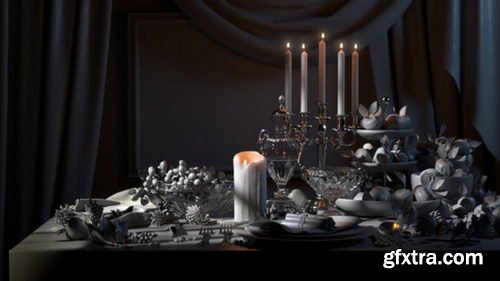
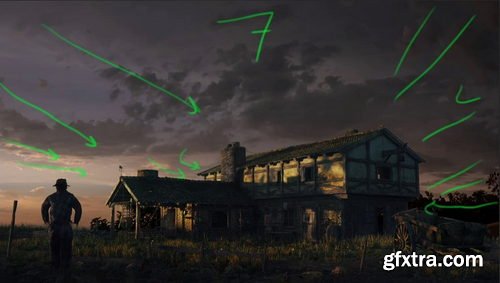
- There are some absolute essentials you need to know when tackling lighting in CG. This 5-hour workshop by Adrien Vallecilla sheds light on everything you need to be aware of when lighting 3D environments, particularly if you’re looking to become a successful lighter or look-dev artist working in digital production.
- The workshop kicks off with fundamental lighting theory, discussing the core differences between real-world lighting and CG, as well as how to recreate natural phenomena using 3D tools. In this case, Adrien teaches using Maya with Redshift, however, the theory can be applied to other 3D packages and rendering engines. You’ll learn how to set up convincing lighting, how to optimize your lighting and rendering settings, plus Adrien also details the key differences between rendering with CPU and GPU engines to help you transfer your knowledge to your tools of choice. The lecture concludes with a look at compositing all of the lighting passes rendered from Redshift inside Nuke.
- The Maya Environment Scene file, HDR image, and Cryptomatte file are provided with this workshop. Links to the models featured by Adrien can be found below. You can also use your own 3D models to create a still-life scene while following along with the theory and practice taught.
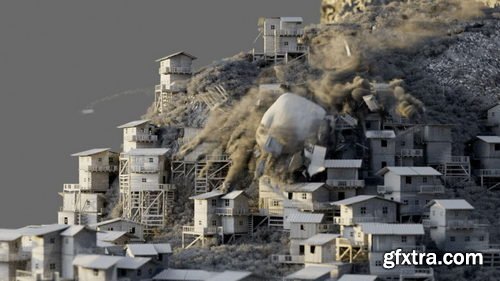
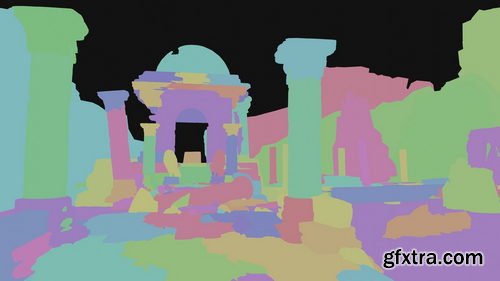
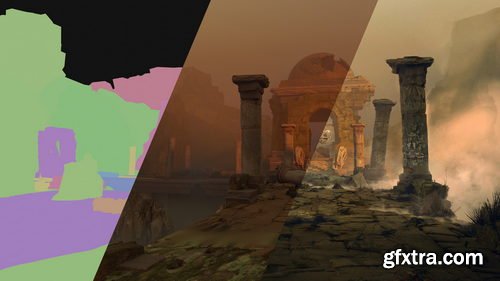
- Discover how to build a fully scalable cinematic destruction shot in Houdini using professional procedural techniques. Recommended for intermediate-level Houdini artists, this 8-hour workshop by David Silberbauer guides you through how to manipulate attributes in Houdini, covers terrains and height field basics, and details how to compile blocks. You’ll see how to randomize attributes, how to set up a fracturing system and build custom constraints. You’ll also learn how to set up a DOP Network to handle RBD destruction setup and review the important TBD basics in SOPs. From there, David guides you through customizing velocities for use in POP networks and then using POPs for debris, as well as how to manipulate debris to use it as a volume source.
- This workshop details how to build from a volume source to create dust with the Pyro Solver, moving on to handling a large-scale simulation. You’ll learn how to not only work in a procedural way but also how to think procedurally, helping all artists feel empowered to build their own large-scale scenes. While this workshop is intended for intermediate users, it also offers an interesting insight for anyone with basic Houdini knowledge looking to learn more about professional industry workflows.
- A Houdini apprentice file with a basic cinematic destruction setup is provided with this workshop.

https://www.patreon.com/posts/creating-assets-86978757
Unlock the power of Houdini’s procedural tools with Cgside and learn how to design highly customizable environment assets. This tutorial walks you through the entire process, from generating natural elements like rocks, trees, and terrain to optimizing them for real-time use. Whether you're a game developer, VFX artist, or 3D enthusiast, this video will equip you with the skills to create immersive, dynamic environments. Watch now and elevate your procedural workflow!
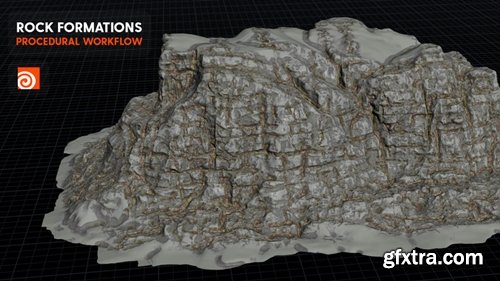
https://www.patreon.com/posts/rock-formations-87559744
Discover how to create dynamic and lifelike rock formations using Houdini’s heightfield tools in this Cgside tutorial. This video guides you through the entire process, from terrain generation and erosion effects to adding fine details and textures. Whether you're working on game environments, VFX, or 3D art, this tutorial will equip you with the skills to craft stunning natural landscapes. Watch now and take your procedural terrain creation to the next level!

Join Cgside in this advanced tutorial and dive into the power of VEX for shading and looping techniques. Learn how to create dynamic, procedural effects and optimize your workflows with practical examples and expert tips. As a bonus, you’ll get access to exclusive project files to enhance your learning experience. Perfect for 3D artists and technical directors, this video will take your Houdini skills to the next level. Watch now and unlock new creative possibilities!
Language: English | Size: 6.77 GB | Duration: 4h 18m
https://www.udemy.com/course/fantastic-forest-concept-art/
Create Epic Concept Art for Film, Animation or Games - Mastering Fantasy Art in Photoshop
Udemy - Mastering ZBrush Sculpting a Dwarf Head in 180 Minutes
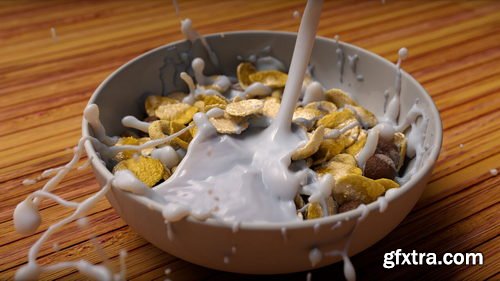
- Simulate milk pouring into a bowl of cereal to learn the art of interacting with Rigid Body Dynamic objects and FLIP Fluid Particles. This 3.5-hour workshop by Stavros Sofianos will teach you how to craft a dynamic, art-directable splash effect, filling the bowl with milk and allowing your cereal pieces to float. This tutorial is created for intermediate-level artists with a basic understanding of Houdini.
- Stavros begins by creating various layers of cereal and placing them in a simple yet effective way that will allow you to create a pleasing splash interaction later using the FLIP solver. You’ll also explore a Voronoi fracture technique to correctly create proxies that can be used in an RBD simulation to generate the initial state of the cereal in the bowl.
- You will discover how to reconnect the proxies back to the original geometries, how to create the emitters for the FLIP simulation, how to master a custom stick field technique so you can control the stickiness of the milk on the bowl and on the cereal, and you’ll learn how to efficiently set up an RBD and FLIP solver together to interact with each other.
- This workshop also details how to create our own custom mesh for the FLIP simulation, shows a technique for generating wet maps, and covers Stavros’s shading and rendering techniques using the Arnold renderer.
- Project files provided with this workshop include two bowl geometry files (one in Alembic and one in FBX format) and the Houdini file with the setup that Stavros created for this workshop. Links to the models and free assets used are also provided.
- In this Maya Customization for Faster Animation workshop, Ari Flesch, Animator on The Last of Us Part II, shares a personal collection of all the industry-proven tips, tricks, scripts, and hotkeys that make animation in Maya faster and more efficient for animators working to tight deadlines.
- The goal of this workshop is to provide specific knowledge to animators already experienced in Maya that will speed up workflow and make you a more powerful animator working in production.
- This 2-hour workshop brings to light some lesser-used tools, reveals the preferences that will increase your productivity, highlights powerful scripts that you’ll be able to apply to your future animation projects, discusses the important marking menu setups, plus many more insights to improve your approach to animation projects. The lessons are taught with animators in mind, with the aim to help you harness some of the hidden powers of Maya for pain-free and speedier animating.
- Available to download with this workshop is a PDF file containing all the covered content and resources to assist you in your learning.
- This character FX workshop taught by Lead Creature FX TD Rohit Jain, guides you through a tried-and-tested production workflow using nCloth to simulate costumes in Maya. Drawing upon 12 years of industry experience, Rohit’s essential training gives artists a solid foundation of how to set up and simulate a 3D character’s costume, including the process of attaching mocap data to a character model.
- Over 15 chapters, Rohit shares not only step-by-step processes but also walks through many of the fundamentals and rules of his workflow along the way. The workshop covers how to create and clean up your own mocap assets — or you can download Rohit’s mocap files with this tutorial and follow along. Plus, learn about the importance of the low-res sim mesh and good topology, as well as how to identify problem areas and retopologize your mesh using Mudbox.
- The tutorials walk through how to import mo-cap files and prepare for the cloth FX simulation and explains the five important menus in Maya that you need to know when dealing with cloth simulations. Rohit teaches how to convert any mesh to cloth using nCloth, how to simulate the layers of clothing and character accessories, as well as how to fix simulation issues when they occur. With more than five hours of instruction, the lectures are delivered step by step to allow you to follow along with every part of the workflow. As a bonus chapter, Rohit also offers some of his top industry tips and tricks that he relies on daily in VFX production.
- Discover how professional artists working in feature films use paint-overs and projections to speed up their workflow, allowing for more techniques to be accomplished in compositing without needing to jump back into 3D. Generalist Nacho Thomas shares non-destructive techniques to help artists level up their renders by creating comp-friendly projections using AOV sequences in Nuke.
- This 7-hour workshop demonstrates production-ready techniques using non-destructive workflows. You’ll discover efficient solutions to create your own projections, giving you more time to focus on your art. Nacho begins with an overview of the Maya process, emphasizing how to work with large environments and handle the AOV outputs. Arnold is used to render, though the techniques demonstrated are common to most renderers. Nacho then progresses to Nuke, where the focus of this workshop lies. The workflow involves occasionally jumping into Photoshop to handle any digital painting work.
- This tutorial is intended for both 2D and 3D artists looking to advance their skills; generalists and environment artists with some working knowledge of Nuke will also greatly benefit from the techniques showcased. In the Nuke segment of this workshop, you’ll learn how to work with an AOV sequence. You will discover how to build your own tools in Nuke, and create your own production-ready tools to add to your workflow. Nacho’s Nuke master file and three sequences used for the shot (Beauty, Utility, and Volumetrics) with light groups and all necessary passes to follow along are provided with this workshop as downloadable project files.
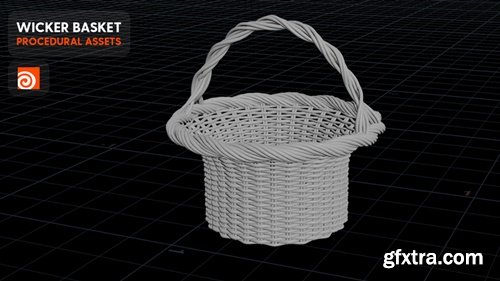
https://www.patreon.com/posts/procedural-in-88597100
Join Cgside in this step-by-step tutorial and learn how to create a highly detailed, procedurally generated wicker basket. This video covers everything from modeling the intricate weave pattern to texturing and shading, ensuring a realistic and customizable result. Perfect for 3D artists and Houdini enthusiasts, this tutorial will enhance your procedural modeling skills and add a unique, handcrafted touch to your projects. Watch now and start weaving your creativity!


Skillshare - 3D Animation Body Mechanics Practice a Layered Workflow & Animate a Jump Using in Maya Study Hall
Skillshare - 3D Animation in Blender: Use Blocking for Simple Splining and Refining
Block, spline, refine, and polish a 3D animation in Blender with ease.
When Sir Wade Neistadt first started animating in 3D, he wasn’t sure where to start. Now almost a decade into the industry, Sir Wade has built a career in 3D animation as a freelance animator, content creator, and educator. With over 230K YouTube subscribers and 3D animation collaborations with brands like Adobe and LG, he has helped thousands of aspiring and professional animators find their place in the world in 3D animation. Now, Sir Wade created this series of four classes as the resource he wished he had when he was learning 3D animation.

Skillshare - Moving From Blender to Maya: Learn a Layered Animation Workflow
https://www.skillshare.com/en/classes/moving-from-blender-to-maya-learn-a-layered-animation-workflow/992930012
- Blender's Grease Pencil is a powerful and versatile tool that enables you to bring your 2D sketches and drawings to life in a 3D environment. Whether you're a seasoned Blender user or completely new to this software, this course will take you on a journey through the intricacies of Grease Pencil, from the fundamentals to tips and tricks that will have you drawing like a professional.

Skillshare - Blender VFX: Create a Venom Symbiote Effect on Spider-Man (Step-by-Step)
https://www.skillshare.com/en/classes/blender-vfx-create-a-venom-symbiote-effect-on-spider-man-step-by-step/2012950040
Welcome to "Create the Venom Symbiote Effect on Spider-Man in Blender!" This Skillshare class is designed to guide you step-by-step through creating a realistic Venom symbiote effect in Blender that attaches to Spider-Man. If you’re new to Blender or looking to level up with cool character effects, this class is for you!
Language: English | Size: 1.17 GB | Duration: 2h 24m
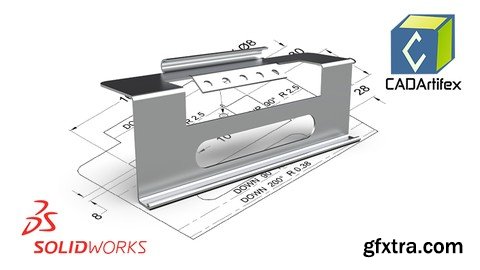
https://www.udemy.com/course/learn-solidworks-sheet-metal-from-concept-to-creation/
From Scratch to Production: A Complete Guide to SOLIDWORKS Sheet Metal Design
126,000 Royalty-Free 3D Model
Udemy Türkçe


Top Rated News
- CreativeLive Tutorial Collections
- Fasttracktutorials Course
- Chaos Cosmos Library
- MRMockup - Mockup Bundle
- Finding North Photography
- Sean Archer
- John Gress Photography
- Motion Science
- AwTeaches
- Learn Squared
- PhotoWhoa
- Houdini-Course
- Photigy
- August Dering Photography
- StudioGuti
- Creatoom
- Creature Art Teacher
- Creator Foundry
- Patreon Collections
- Udemy - Turkce
- BigFilms
- Jerry Ghionis
- ACIDBITE
- BigMediumSmall
- Globe Plants
- Unleashed Education
- The School of Photography
- Visual Education
- LeartesStudios - Cosmos
- Fxphd
- All Veer Fancy Collection!
- All OJO Images
- All ZZVe Vectors
- CGTrader 1 CGTrader 2


